How do I remove a CPU from a motherboard?
Are you ready to upgrade your CPU? Before you dive into the exciting world of hardware upgrades, learn how to remove a CPU from a motherboard. This essential process requires careful handling and attention to detail to prevent any damage.
Preparing for CPU Removal
Before you dive into removing your CPU from the motherboard, it’s crucial to make some preparations. This step ensures a smooth and safe process, minimizing the risk of damage.
Turning Off and Unplugging the Computer
First things first, shut down your computer properly. Click on the “Start” menu, select “Shut Down,” and wait until the system completely powers off. This step prevents any potential data loss or damage to your computer components.
Next, unplug the power cord from the wall outlet. This action eliminates the risk of electric shock and ensures your safety throughout the process. Remember, safety first!
Grounding Yourself to Prevent Electrostatic Discharge
Electrostatic discharge can be harmful to sensitive computer components, such as the CPU. To prevent this, you need to ground yourself properly. Simply put, this means getting rid of any static electricity from your body.
Before touching any computer parts, touch a metal object that is grounded, such as the computer case. This action helps discharge any static electricity that might have built up in your body. By doing so, you minimize the chances of damaging the delicate circuitry of your CPU.
Tools Required for CPU Removal
To successfully remove the CPU, you’ll need a few tools at hand. Make sure you have a screwdriver with appropriate heads for the screws on your motherboard. Additionally, having a thermal paste remover ensures a clean and smooth removal process.
The screwdriver is used to remove the CPU cooler, which is usually attached to the motherboard. The thermal paste remover comes in handy when you need to clean the old thermal paste from the CPU and heatsink. These tools are essential for a hassle-free CPU removal experience.
Removing the CPU Cooler
Before you can remove the CPU from the motherboard, you need to take off the CPU cooler. The CPU cooler consists of a fan and a heatsink that help keep the CPU cool during operation. Let’s walk through the process of removing the CPU cooler step by step, ensuring a smooth and safe removal process.
To begin, locate the CPU cooler on your motherboard. It is usually secured by screws and might have clips or brackets holding it in place. Gently remove any cables connected to the fan, ensuring you remember their positions for reinstallation.
Now, grab your screwdriver and carefully unscrew the screws that secure the CPU cooler to the motherboard. Make sure to keep the screws in a safe place, as you will need them later. Once the screws are removed, you can start detaching the CPU cooler from the motherboard.
Gently lift the CPU cooler off the motherboard, ensuring that you don’t apply excessive force. The CPU cooler might still be connected to the CPU with thermal paste, so be cautious not to damage the CPU or the motherboard while removing it.
As you remove the CPU cooler, pay attention to any resistance or sticking points. If it feels stuck, gently wiggle it back and forth to loosen it. Take your time, as rushing might result in accidental damage to the motherboard.
Remember, it’s crucial to be gentle during this process to avoid any harm to the delicate components. The motherboard is a sensitive piece of hardware, and mishandling it can lead to costly repairs or replacements.
Unclipping the CPU

Now that you have successfully removed the CPU cooler, it’s time to unclip the CPU itself from the motherboard. This step requires precision and care to avoid any damage to the CPU or the motherboard. Let’s dive into the process of unclipping the CPU step by step.
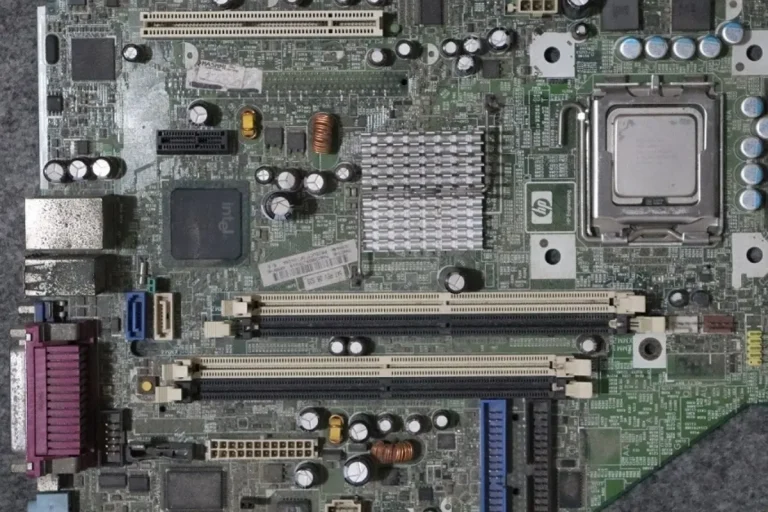
Locating and Unclipping the CPU Socket Lever
First, locate the CPU socket lever on the motherboard. The lever is usually situated near the CPU socket and secures the CPU in place. Carefully examine the lever to familiarize yourself with its mechanism.
To unclip the CPU socket lever, gently lift it upwards. This action releases the pressure holding the CPU in place. Be cautious not to apply excessive force or jerk the lever abruptly, as it may damage the CPU or the motherboard.
Gently Lifting the Lever to Release the CPU
With the CPU socket lever lifted, you can now proceed to release the CPU. Hold the CPU by its edges, ensuring not touch the delicate pins or the thermal paste on the underside. Slowly lift the CPU straight up, keeping it level to avoid bending any pins.
As you lift the CPU, you may feel a slight resistance due to the thermal paste’s adhesive properties. Take your time and be patient to prevent any mishaps. Remember, handling the CPU with care is crucial to avoid damage.
Handling the CPU by Its Edges to Prevent Damage
When handling the CPU, it’s important to hold it by its edges only. Avoid touching the pins or the thermal paste, as any contaminants can affect its performance. Additionally, be mindful of static electricity and ensure you are properly grounded before touching the CPU.
Frequently asked questions
1. How do I lift the CPU out of the socket?
To lift the CPU out of the socket, gently hold it by the edges and lift it straight up, applying even pressure on both sides. Avoid using excessive force or any twisting motions.
2. Can I clean the CPU and socket if necessary?
Yes, if necessary, you can clean the CPU and socket. Use a soft, lint-free cloth or compressed air to gently remove any dust, debris, or thermal paste residue. Be cautious not to bend any pins while cleaning.
3. What should I avoid while removing the CPU?
While removing the CPU, it’s important to avoid using excessive force or any twisting motions. These actions can damage the delicate pins or the motherboard. Lift the CPU straight up with even pressure on both sides.
4. What can I do if the CPU seems stuck in the socket?
If the CPU seems stuck, do not force it. Double-check that the CPU socket lever is fully lifted and try again. Patience is key in this process to avoid any accidental damage.
5. Is it necessary to clean the CPU and socket after removal?
Cleaning the CPU and socket after removal is a good practice to ensure optimal performance. Dust, debris, or thermal paste residue can affect the CPU’s cooling and overall functionality. However, only clean if necessary and be careful not to
Conclusion
In conclusion, removing a CPU from a motherboard requires careful handling and attention to detail. By following the step-by-step instructions, gently lifting the CPU straight up without using excessive force or twisting motions, and cleaning if necessary, you can safely remove the CPU without any damage.